
My nephew’s birthday was coming up in a couple days and I wanted to build or (3D) print him something. He loves Hot Wheels, so I thought I’d make him a speedometer with a digital speed readout. I envisioned two LEDs illuminating two photoresistors. When the car speeds by it would block one photoresistor and then the other. Simple! Well, suddenly it was a year or two later and his birthday was coming up again. I don’t remember why I didn’t finish the project the first time, but now I was determined. (I think for that previous birthday I printed him a rocket, so I wasn’t a complete failure of an uncle.)
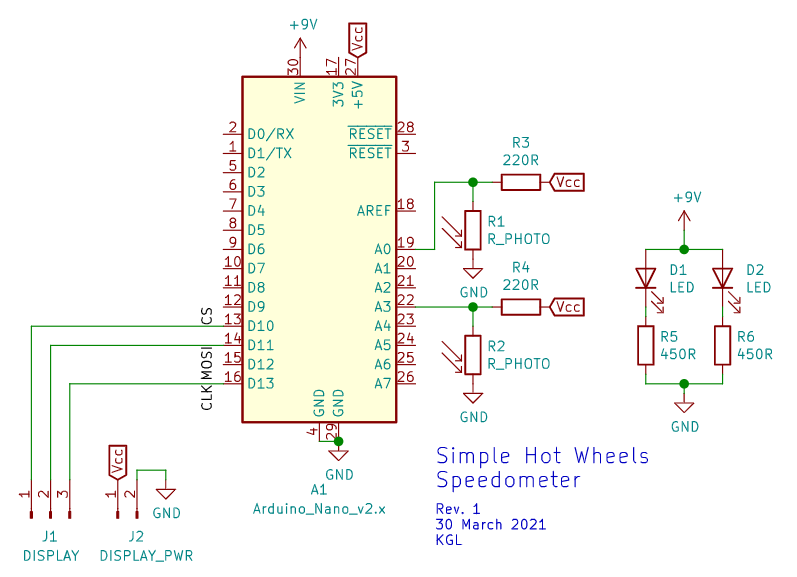
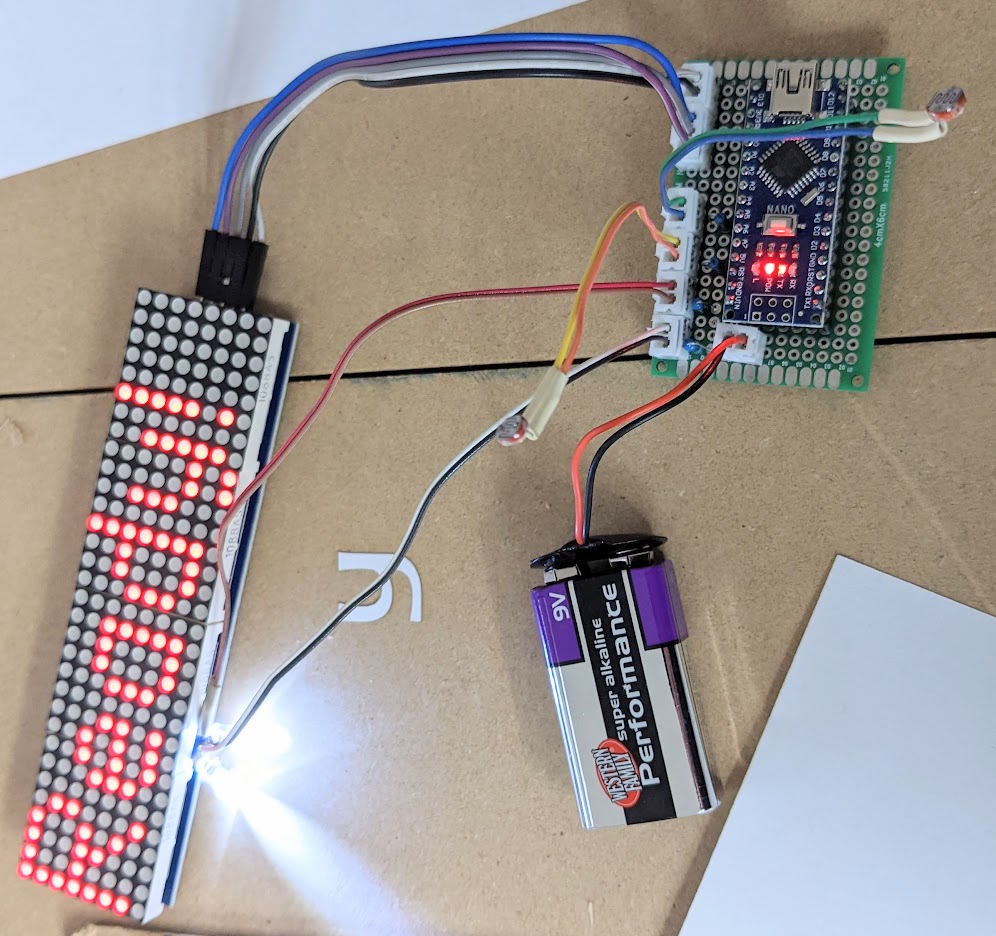
The figure above shows the circuit schematic for the speedometer. I used an Arduino Nano, a 9 V battery, two cadmium sulfide photoresistors, two 220 Ω resistors for the voltage divider, two 5 mm white LEDs, two current limiting 450 Ω resistors, an 8×32 LED display with MAX7219, and a 4 cm x 6 cm perfboard. A switch was added later. Most of the connections were made with 2- and 3-pin JST connectors as opposed to direct soldering, since this is still pretty much a prototype. You can see the assembled board in the figure below. Sorry, I didn’t take any underside photos.
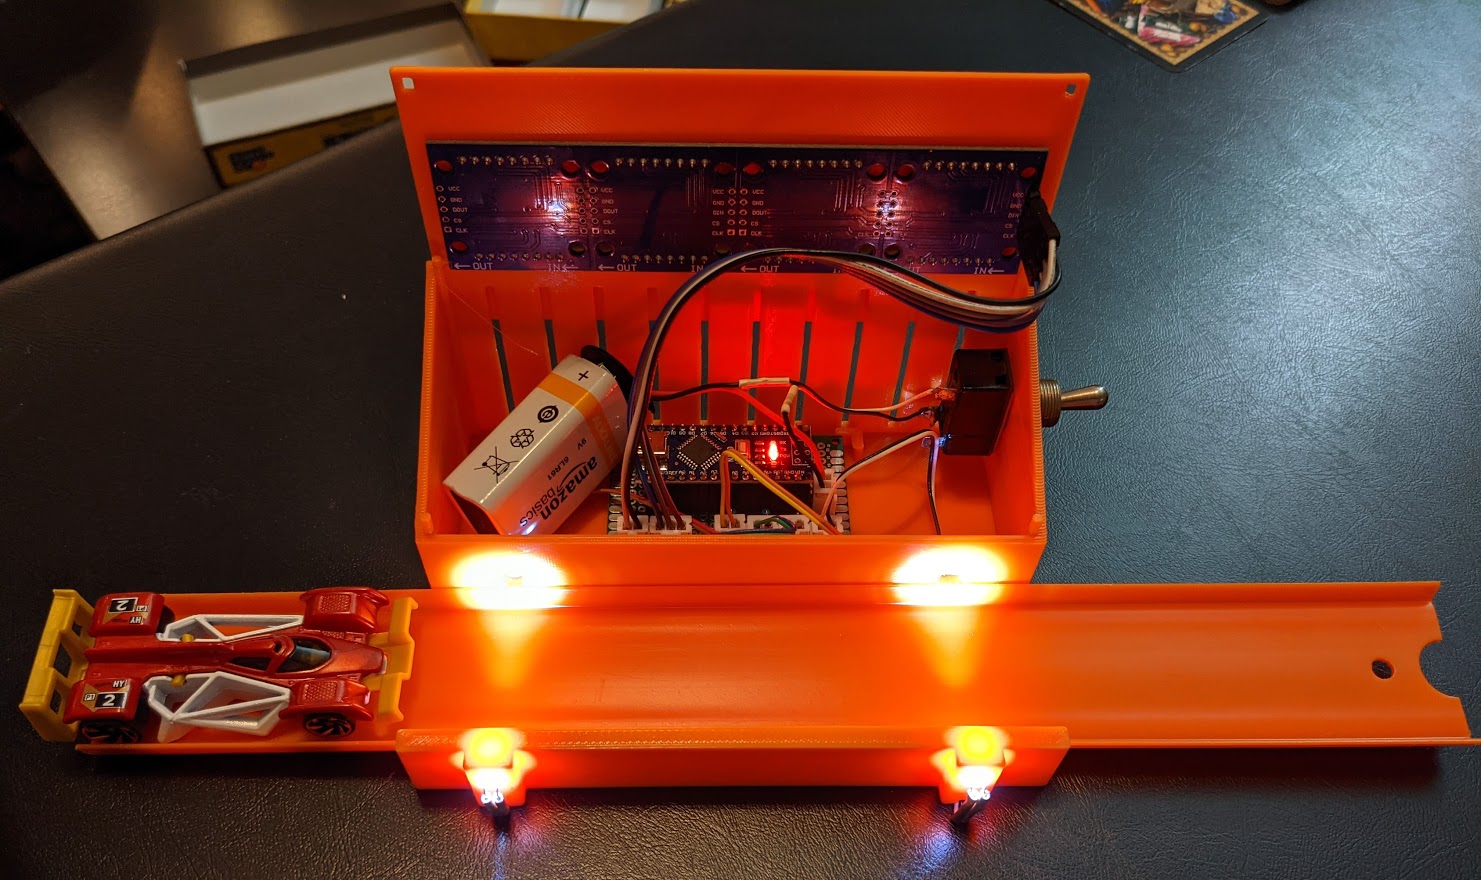
I designed a very simple enclosure for the electronics. The important part is the separation of the light/photoresistor pairs. In my model this distance is 100 mm. I didn’t have time to come up with a secure latching mechanism for the lid (because I only had time to print it once). My choice of small posts, each with a bump, seemed OK in theory, but were much to small. Within the first week my nephew dropped the device onto carpet and all the posts broke. While I’m working on an updated model, the lid is being held in place with clear tape. Also, the part that holds the perfboard in the original model was made slightly longer than it should have been. The board still fits, but barely. You can download the STL here. Hopefully, I’ll update this post when I fix the design.
The Arduino code for the speedometer is below. It is adapted from an example in the MD_MAX72XX Arduino library (github), which you will need to compile the sketch. It is very basic. It simply finds a moving average for the ADC values associated with each photoresistor voltage divider, and triggers the next state when the instantaneous ADC value goes above two times the average. The speed in inches per second is found by dividing the length (3.9 inches) by the time between triggering the two photoresistors. This is sent to the display using the logic from the MD_MAX72XX example.
To summarize this project: it’s ugly, but it works!
// Code modified from the MD_MAX72XX example to display text from serial.
// Hot Wheels Speedometer
// kylelarsen.com

#include <MD_MAX72xx.h>
#include <SPI.h>

#define PRINT(s, v) { Serial.print(F(s)); Serial.print(v); }

// Define the number of devices we have in the chain and the hardware interface
// NOTE: These pin numbers will probably not work with your hardware and may
// need to be adapted
#define HARDWARE_TYPE MD_MAX72XX::FC16_HW
#define MAX_DEVICES 4

#define CLK_PIN   13  // or SCK
#define DATA_PIN  11  // or MOSI
#define CS_PIN    10  // or SS

// SPI hardware interface
MD_MAX72XX mx = MD_MAX72XX(HARDWARE_TYPE, CS_PIN, MAX_DEVICES);

// Text parameters
#define CHAR_SPACING  1 // pixels between characters

// Global message buffers shared by Serial and Scrolling functions
#define BUF_SIZE  75
char message[BUF_SIZE] = "Ready!";
bool newMessageAvailable = true;

// Distance between sensors
// LDR = Light dependent resistor

// Distance between LDRs
float ldr_dist = 3.937; // inches

int ldrA_pin = A3;
int ldrB_pin = A0;

// ADC values
unsigned int ldrA = 0;
unsigned int ldrB = 0;

// Last time LDR was triggered
unsigned long ldrA_time = 0;
unsigned long ldrB_time = 0;

// Number of points to average for baseline. Cannot go too high because of limited memory
const int     ldr_avg_num = 128;
// TO DO: Am I going to use this array for anything besides average?
unsigned long ldrA_avg_arr[ldr_avg_num];
unsigned long ldrB_avg_arr[ldr_avg_num];
unsigned long ldrA_avg    = 0;
unsigned long ldrB_avg    = 0;
unsigned int  ldr_avg_idx = 0;

// Simple state machine.
//  WAIT_A - waiting for the car to pass the first LDR
//  WAIT_B - waiting for the car to pass the second LDR
enum Status {WAIT_A, WAIT_B};
Status status = WAIT_A;

void printText(uint8_t modStart, uint8_t modEnd, char *pMsg);

void setup()
{
  mx.begin();
  mx.control(MD_MAX72XX::INTENSITY, 1);

  Serial.begin(57600);
}

void loop()
{
  if (newMessageAvailable)
  {
    // Send message to display
    printText(0, MAX_DEVICES-1, message);
    newMessageAvailable = false;
  }

  // Read the values for the LDRs
  ldrA = analogRead(ldrA_pin);
  ldrB = analogRead(ldrB_pin);

  // Add to rolling average array
  ldrA_avg_arr[ldr_avg_idx] = ldrA;
  ldrB_avg_arr[ldr_avg_idx] = ldrB;

  ldr_avg_idx++;

  if (ldr_avg_idx >= ldr_avg_num)
  {
    ldr_avg_idx = 0;
  }

  // Do the rolling average
  int i;
  ldrA_avg = 0;
  ldrB_avg = 0;
  for (i = 0; i < ldr_avg_num; i++)
  {
    // If we reach a value that is exactly 0 then the ldrN_avg_arr hasn't filled up yet.
    if (ldrA_avg_arr[i] == 0 || ldrB_avg_arr[i] == 0)
    {
      break;
    }

    ldrA_avg += ldrA_avg_arr[i];
    ldrB_avg += ldrB_avg_arr[i];
  }

  ldrA_avg /= i; // ldr_avg_num;
  ldrB_avg /= i; // ldr_avg_num;

  // The trigger threshold is two times the average
  if (status == WAIT_A && ldrA > 2*ldrA_avg) {
    ldrA_time = millis();
    status = WAIT_B;
  }

  // Again, the trigger threshold is two times the average,
  // but the car must have already passed the first LDR.
  if (status == WAIT_B && ldrB > 2*ldrB_avg) {
    ldrB_time = millis();

    float dt = ((float)(ldrB_time - ldrA_time) / 1000 ); // seconds

    // Speed = Distance / time
    sprintf(message, "%d in/s", (int)(ldr_dist / dt));
    newMessageAvailable = true;

    status = WAIT_A;
  }

  // Ten second timeout
  if (status == WAIT_B && (millis() - ldrA_time) > 10000)
  {
    status = WAIT_A;
    ldrA_time = 0;
  }

  // View with arduino or other plotter
  Serial.print(ldrA);
  Serial.print(",");
  Serial.print(ldrB);
  Serial.print(",");
  Serial.print(ldrA_avg);
  Serial.print(",");
  Serial.print(ldrB_avg);
  Serial.print("\n");


  delay(5);

}


void printText(uint8_t modStart, uint8_t modEnd, char *pMsg)
// Print the text string to the LED matrix modules specified.
// Message area is padded with blank columns after printing.
{
  uint8_t   state = 0;
  uint8_t   curLen;
  uint16_t  showLen;
  uint8_t   cBuf[8];
  int16_t   col = ((modEnd + 1) * COL_SIZE) - 1;

  mx.control(modStart, modEnd, MD_MAX72XX::UPDATE, MD_MAX72XX::OFF);

  do     // finite state machine to print the characters in the space available
  {
    switch(state)
    {
      case 0: // Load the next character from the font table
        // if we reached end of message, reset the message pointer
        if (*pMsg == '\0')
        {
          showLen = col - (modEnd * COL_SIZE);  // padding characters
          state = 2;
          break;
        }

        // retrieve the next character form the font file
        showLen = mx.getChar(*pMsg++, sizeof(cBuf)/sizeof(cBuf[0]), cBuf);
        curLen = 0;
        state++;
        // !! deliberately fall through to next state to start displaying

      case 1: // display the next part of the character
        mx.setColumn(col--, cBuf[curLen++]);

        // done with font character, now display the space between chars
        if (curLen == showLen)
        {
          showLen = CHAR_SPACING;
          state = 2;
        }
        break;

      case 2: // initialize state for displaying empty columns
        curLen = 0;
        state++;
        // fall through

      case 3:  // display inter-character spacing or end of message padding (blank columns)
        mx.setColumn(col--, 0);
        curLen++;
        if (curLen == showLen)
          state = 0;
        break;

      default:
        col = -1;   // this definitely ends the do loop
    }
  } while (col >= (modStart * COL_SIZE));

  mx.control(modStart, modEnd, MD_MAX72XX::UPDATE, MD_MAX72XX::ON);
}
4 replies on “DIY Hot Wheels speedometer”
Would you be willing to make one to sell? If so what would a price point be?
I’m sorry for the late reply. I am not able to make these for sale. To be honest, the 3D model needs an overhaul. My nephew dropped this a few times, and now we have to secure the lid with tape. I’ve learned that the prototype nature of the toy doesn’t lend itself well to actual use :/
Hey this is an awesome project and I’m using a bunch of your code in a version for a project that I’m doing. Would it be possible to get you to check my code and give me some pointers (i’m a total noob). In exchange I actually do 3d printing and cad work myself and could design you a “better” enclosure.
Cheers!
I’ve sent you an email! I don’t have a need for a new enclosure, but I’m sure the community would appreciate anything you release.